Unlike art, the content of photojournalism is not, for the most part, controlled by the photographer.
This was never more true than during the attacks of September 11, 2001. This has been called one of the most photographed events in history. All of you weren't even born when this event happened, but it is still a very important moment in the collective memory of most Americans.
Imagine being a photojournalist on that day, running into this disaster while most people are running away. In the midst of this misery and chaos, it's a photojournalists job to capture the the human side of the story in an orderly and effective way.
You will learn about some composition techniques and find examples of how photojournalists applied them to the chaos of 9/11.
- Everyone must read about the the rules of "Simplicity, The Rule of Thirds, Lines, Balance, Framing, and Avoiding Mergers" on the following web site:
- Go to the four websites below, and find excellent examples of photos shot on 9/11 that follow each of the rules. When you find one that you think fits the Composition rule, save it into your AISD Google Drive. I would suggest you make a new folder called Composition 9/11 inside the folder you made for my class.
On your Google Site, create a new subpage called Composition 9/11 and share one example of each of the six techniques from the composition web site, that you saved into your Google Drive
Make sure to title each photo with a text box that tells me the name of the technique.
For example- Post a photo with "Framing" as the title. You will need to do a post for each of the composition techniques. Which means you should have SIX photos on your page today, labelled correctly.
Here are the websites - they should be clickable links, if not copy and paste then into a new browser window.
(for the Daily Beast website above, there are 25 pictures make sure you find the clickable link labelled
It may be hard to get these images to right-click and save to your folder on the server. If you want, you are welcome to do a google search for specific images and save those images. The important thing is that you are picking photos that show me you understand the six composition rules and getting them onto your Google Site. You can also take a screenshot. Please make sure you have the image as big as possible on your screen. Press the Shift/Control and number 4 key. This will give you a target/bullseye instead of a cursor. You can then click and drag across the entire photo and it will save a screenshot either on your desktop or in your download folder. Use the finder (the smiling face in your doc) to find the image and then put it on your Google Drive to place into your Google Site.
When you have found 6 photos, ONE for each of the composition "rule" we looked at today, make sure you have them labeled and then push Publish. Don't forget you have to push that button TWICE.
When your done - you might be interested to read this story - if you post your reactions (meaning you create a new Google Site subpage called Falling Man extra credit and you write at least TWO paragraphs (250 words minimum and I will be checking this one, if you need a word count, write your paragraphs in a google doc and then copy and paste it onto your Google Site subpage), responding to what you read and saw, I will give you extra credit points. This is graphic and not the easiest thing to read, so if you are squeamish, you might want to skip this one. Once you click the link, hit continue and it should redirect you to the website.
Richard Drew on photographing the "Falling Man" on 9/11After almost six decades as a photographer, Richard Drew has learned a basic rule: "That you can be two hours early, but you can't be a 60th-of-a-second late. In other words, if you're not there when it happens, you can't take a picture of it."
Drew, who has worked for the Associated Press for the past 51 years, was there in time to capture Frank Sinatra escorting Jackie Onassis … Muhammad Ali delivering a knockout punch … and Ross Perot bursting into the 1992 presidential race in a way that so captured the pepper pot billionaire, it helped AP win the Pulitzer Prize.
But on September 11, 2001, when he made one of the most searing pictures of that day, he was not at the World Trade Center at 8:46 a.m., or 9:03 a.m., when the planes hit the towers. He had been on assignment at a maternity fashion show in Midtown when his office called: "'A plane has hit the World Trade Center,' very calmly," he recalled.
He dove into the subway and emerged on the southern tip of Manhattan.
Correspondent John Dickerson asked, "When did you start making pictures?"
"The minute I came out of the subway," Drew replied.
"What's going through your mind when you're taking them?"
"It's all reflexive. You just do it. You just do your job."
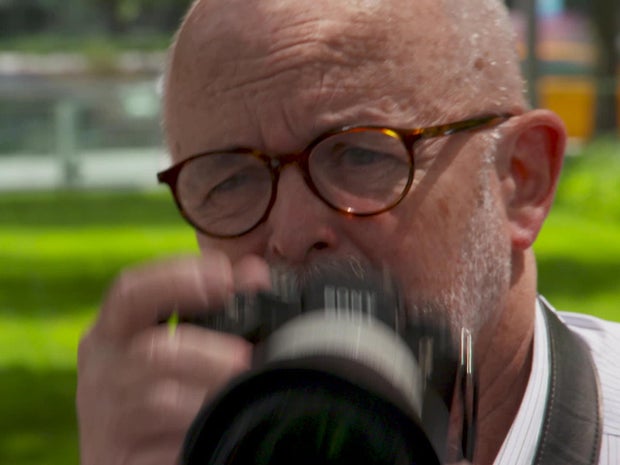
Pulitzer Prize-winning photographer Richard Drew.CBS NEWS
"All of your senses are heightened – then, on the other hand, you have to basically shut something down in order to do your work?"
"You do," Drew said. "You have to just pretend that it's not there. You just do your thing."
Richard Drew has been "doing his thing" since age 19 when, growing up in a suburb of Los Angeles called Temple City, he bought a police scanner: "And I would listen to the police, and then I could, you know, go chase a car accident or a fire or something."
If he wasn't chasing breaking news, he learned to put himself near where news might break.
On June 5, 1968, he decided to see presidential candidate Robert F. Kennedy speak at the Ambassador Hotel in Los Angeles. "The office didn't know I was there; I just assigned myself to go to this job," he said.
Drew went into the kitchen looking for a glass of water. Robert Kennedy was there, too. So was a gunman.
As the 42-year old junior senator lay on the ground, Drew climbed on a table, photographing the chaos. Kennedy's wife approached Drew and the other photographers.
"I also have a picture of Ethel going like this. You know, like, 'Don't, please, don't take pictures of that.' She was asking us, myself and the UPI photographer, not to photograph it."
Dickerson asked, "What did you think when Ethel said, 'Don't take the picture'?"
"Well, that was her choice, but not mine."
"What's your choice?"
"My job is to record history, and I record history every day."
"What happens if you mess with that rule?"
"You're not a journalist," Drew replied. "Then, you're just a person with a camera."
Dickerson asked, "What's the difference between a photograph and just a picture?"
"Whether you're gonna wanna look at it."
Or, in the case of his most famous photograph, whether you're going to want to look away.
Warning - Graphic image:
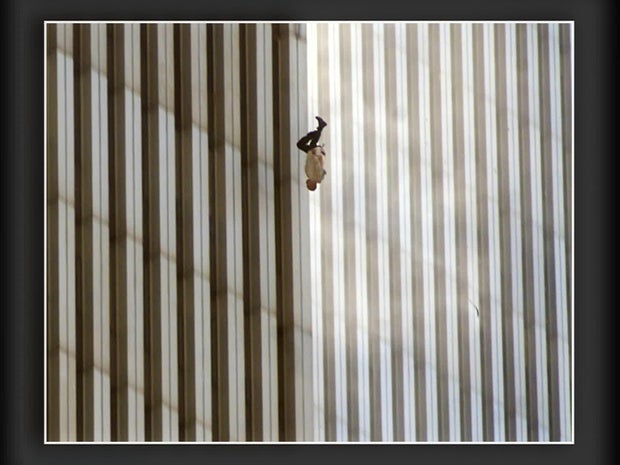
Richard Drew's photo of a man falling from the burning Twin Towers on 9/11.RICHARD DREW/AP
Dickerson asked, "When you made the 'Falling Man' picture, did you know that you had done something extraordinary?"
Drew said, "I didn't take the picture. The camera took the picture of the falling man. And when these people were falling, I would then put my finger on the trigger of the camera and I'd hold the camera up, and I'd photograph and follow them going down, and then the camera would open and close and take the pictures as they were going down. I have, I think, eight or nine frames of this gentleman falling, and the camera just happened to cycle in that time when he was completely vertical. I didn't see that picture really until I got back to the office and then started looking at my stuff on my laptop. I didn't see it."
"Were you scared when you were making pictures on the day you were at the World Trade Center?" Dickerson asked.
"Not really," he replied. "It's interesting that this camera's a filter for me. I didn't know that the building, the first building had collapsed because I was looking at it through a telephoto lens. And I'm only seeing a piece of whatever's going on."
Drew's image, which came to be known as the "Falling Man," appeared in a number of newspapers the next day. Many people found the lonesome vision too shocking.
One high-profile viewer was mesmerized by its deeply-human pull. Five years ago,
Sir Elton John told "Sunday Morning" correspondent Anthony Mason that that he had to purchase the photograph for his personal collection. "It's not a shot that a lot of people probably would want to hang on their wall," John said.
Mason asked, "Why did you want it?"
"Because it's, again, it's just the most incre … it's the most beautiful image of something so tragic. It's probably one of the most perfect photographs ever taken."
Twenty years after the attack, it captures, perhaps more than any other picture, the horror of that day.
Drew said, "It's still sort of that 'verboten' picture. I'll show it to somebody and they'll say, 'Oh, the "Falling Man" – Oh, no, I don't wanna see that.'"
"Why do you think they have that reaction?"
"Because they can identify with it. They can identify, I think, that that could be me."
"When you look at the pictures you made from that period today, what do you think?"
"I think that I would do it the same," he said. "I wouldn't change anything, 'cause, like I said before, it's my job to record history."
Dickerson said, "A picture stops a moment in time. It captures a moment in time."
"And, hopefully, I can stop a reader for that moment in time to catch their attention. And that's what it's really about."
"And is it about transporting them back to that moment?"
"It's to show them what happened in that moment in time, that they weren't there to see," Drew said. "I have that privilege that I can do that."
"And the reader can then come to their own conclusions?"
"They can come to their own conclusion about the 'Falling Man' also, and that's what that's about."
The identity of the falling man has never been determined, though journalists have found two possibilities. Their names, Jonathan Eric Briley and Norberto Hernandez, are only one name apart on the parapets of the 9/11 Memorial.
But Drew was able to help identify another victim on that day: "I can't remember how many actual people I photographed during it, but it wasn't just one or two people. A gentleman called the AP and said that he knew what his fiancée was wearing that day, and they had not recovered her body or anything. And he was wondering if he could look at my photographs at the AP. I actually sat with him on my laptop, and we looked at it, frame by frame, of the people falling from the building. And he saw it. Yeah, he said, 'Oh, that's her.' And that was it."
For a month after the attack, Drew photographed the aftermath: "And my cell phone rang. And it was my daughter. And she says, 'Dad, I just wanna tell you that I love you.' And to this day, she calls me on September 11th no matter where I am to say, 'Dad, I love you.' Because I might not have survived."
Twenty years of phone calls that, in an instant, conjure the searing emotions from that day … just like Richard Drew's photographs.
For more info:Follow
Richard Drew on InstagramThe 9/11 Memorial & Museum, New York City
Story produced by Jay Kernis. Editor: Joseph Frandino.
EXCERPT: 20 years on, ‘The Falling Man’ is still you and meBY RICHARD DREW
Published 11:48 AM CDT, September 9, 2021Share
EDITORS: This story first ran in 2021 for the 20th anniversary of 9/11. It is being republished for the 22nd anniversary.
The following account from Associated Press photographer Richard Drew is excerpted from the book
“September 11: The 9/11 Story, Aftermath and Legacy,” an in-depth look at AP’s coverage of 9/11 and the events that followed. On that day, Drew made one of the most indelible — and harrowing — images of the 21st century. It accompanies this story, but not as the main image.
___
My family calls it “the picture that won’t go away.” Most newspaper editors refused to print it. Those who did, on the day after the World Trade Center attacks, received hundreds of letters of complaint.
The photograph was denounced as coldblooded, ghoulish and sadistic. Then it vanished.
Yet 20 years later, I still get asked about it. I’ve been invited on national talk shows, interviewed by foreign TV crews and asked to speak about it at universities across the country. Esquire magazine published a 7,000-word essay that hailed it as an icon, a masterpiece and a touching work of art. Entertainer and photo collector Sir Elton John called it “probably one of the most perfect photographs ever taken.”
All this for a single frame out of hundreds shot in haste before I was pulled to safety as the second tower of the World Trade Center tumbled toward me.
My fellow photographers called it “the most famous picture nobody’s ever seen.” But, in fact, it was seen. Whenever it’s mentioned, people say, “Oh, that’s the one where the guy looks like he’s swan-diving.” Or, “That’s the one where the guy’s body is lined up perfectly with the lines of the World Trade Center.” And then there is: “I know — it’s the one where, if you turn it upside down, it looks like the guy is sitting on a chair.”
I find that ironic. Here’s a photograph that was considered too upsetting for readers to look at. Yet people were turning it upside down to take a second look from a different angle.
I look at it from my own angle. I was below the north tower that morning, on the corner of West and Vesey streets. The smoke was so thick, it was tough to see and tougher to breathe. Rubble was falling, and when I heard the first of a series of loud cracks, I thought it was the sound of concrete debris striking the ground. But I was wrong. It was the sound of human beings hitting the pavement.
I focused on one person falling through the air, and shot eight frames. Then there was a huge noise, like an explosion. I just kept shooting; I thought maybe the roof had collapsed. I had no idea the whole building was falling, because I was too close.
An emergency technician saved my life; he yanked me away. The tower leaned toward us as we ran, and I stopped and shot nine more frames.
Stupid, probably, but when you’re in shock, it’s like you’re on automatic pilot.
Watching the tragedy unfold messed me up for a long time. I still take note of every plane I hear flying overhead, wondering if it’s friend or foe. But neither the photograph nor the initial reaction to it disturbs me. People ask how I could cold-bloodedly photograph someone dying. I never saw it that way. I made a photographic record of someone living the last moments of his life. And every time I look at it, I see him alive.
ADVERTISEMENT
I have photographed dying. As a 21-year-old rookie photographer on a supposedly routine assignment, I was standing behind Robert F. Kennedy when he was assassinated. That time, there was no telephoto lens to distance me. I was so close that his blood spattered onto my jacket. I saw the life bleed out of him, and I heard Ethel’s screams. Pictures that, shot through my tears, still distress me after 35 years. But nobody refused to print them, as they did the 9/11 photo. Nobody looked away.
It’s hard to say why not. The RFK assassination changed the fabric of American history. But then, so did the destruction of the World Trade Center. The Kennedy pictures were more graphic and, in one sense, more personal. We knew him, as a public figure, a brother, a father and a husband.
It took me the better part of a year after Sept. 11 to even address the question. I was fending off post-traumatic stress syndrome, and I didn’t want to think about it. Then The Associated Press sent me to a camp run by former British special forces for training in how to survive in a hostile situation. You’d think simulating being attacked or kidnapped would have increased my anxieties. But I found it comforting. Knowing how to take even a few preventive measures gave me back a sense of control over my destiny.
As my anxieties abated, I continued to wonder why people reacted so differently to the photos of RFK and the World Trade Center.
One editor who objected to my photo said, “Americans don’t want to look at pictures of death and dying over their morning cornflakes.” I disagree. I think they’re fine with it, as long as the victims aren’t American.
During the Vietnam War, my friend and colleague Nick Ut took a photograph of a girl who’d been napalmed, running down the road in flames. The picture became an instant icon and won the Pulitzer Prize. But no one in the States worried about getting napalmed. The photo evoked sympathy, not empathy.
In the World Trade Center photo, it’s about personal identification. We felt we knew Bobby Kennedy, but we didn’t identify with him. We weren’t wealthy scions of a political dynasty or presidential candidates. We were just ordinary people who had to show up for work, day after day, more often than not in tall office buildings.
Just like the guy at the World Trade Center.
That’s what unsettles people about the picture. We look at it and we put ourselves in the jumper’s place. And we ask, “Which option would I choose? Would I wait and pray for help as the flames licked at me, or jump through fresh air and sunlight, to certain death?”
You see, the girl in Nick Ut’s picture was on fire. You can see the agony on her face. It’s horrifying, but it is not the face of America. The man in my picture is uninjured. He does not look like he’s in pain. But you know he is moments from death. And you can’t help but think, “That could have been me.”
Tom Junod, who wrote the article for Esquire, interviewed the families of several victims trying to identify the man he called “9/11’s Unknown Soldier.” He found their reactions varied according to their own feelings about mortality.
Some were insulted at the suggestion that their relative might have chosen death when he had a family at home (ignoring the fact that death was certain in any case). Others praised his decision to jump as an act of courage (ignoring the possibility that the man might have been forced to leap from the smoke-filled tower in order to breathe).
Though his quest proved fruitless, Junod eventually concluded, as I did, that the point was moot. For we already knew the identity of the man in the picture.
He was you and me.
9/11: The truth behind the famous Falling Man and his real identitynews.com.au
11 Sep, 2020 04:54 PM7 mins to read
The usually bustling express subway was completely empty on the morning of September 11, 2001. Except for one man.
It was unusual for a carriage speeding from Times Square downtown into New York City's financial trading district during morning peak hour to have just one solo rider, and Richard Drew had no idea he was about to capture one of the most compelling and controversial photographs in history.
Drew, an AP photographer, had been shooting a maternity fashion show for New York Fashion Week in Bryant Park, in the city's midtown area, when he received a tip from a CNN cameraman that a plane had just crashed into the north tower of the Twin Towers. Sixteen minutes later, another would strike the south tower.
He took a gamble and headed for the subway.
What he saw when he emerged, one block from the World Trade Centre, was utter mayhem. Both buildings were on fire. Smoke filled the air. He had no idea a second plane had hit until he was standing between a police officer and an Emergency Medical Technician (EMT).
"The officer said the second plane was a big effin' plane," Drew recalled.
He could see both towers by this stage.
"There goes another," said the EMT nearby, and as Drew looked up, flickering objects appeared above. At first onlookers thought it was debris; American Airlines Flight 11 had crashed into the building only a few minutes before. It was 8.46am.
"It took three or four to realise: They were people," James Logozzo told USA Today at the time. Logozzo was with co-workers on the 72nd floor of the south tower when the plane hit.
"Then this one woman fell."
Logozzo remembered her face, her dark hair, olive skin – and the way she fell.
Many survivors of that day still say the bodies falling from the sky were one of their most haunting memories. The north tower held for 102 minutes after the plane hit. People jumped constantly, consistently, through that entire time. Most jumped from the north tower; a handful from the south.
They were either "forced out by the smoke and flames or blown out", Ellen Borakove, the New York City medical examiner's office spokeswoman, told USA Today.
It took just 10 seconds to fall. They weren't unconscious as they fell, but death was instant. Some jumped alone. Some jumped in groups. Some jumped in pairs.
Drew, watching the horror unfold, began to take pictures. By this stage both towers had been hit and were billowing smoke.
Then he heard the boom of the south tower as it began to crumble. It toppled around him, "exploding like a mushroom".
Some of those in the south tower included Joseph Visciano, whose family told news.com.au he was on the 89th floor when the tragedy struck.
"Joe was 22, and a graduate of Boston college. He had only been working for six weeks. He was training to be a trader. He was so happy he got the job."
Images and footage of the horror unfolding in New York were seen around the world. But one photo captured the tragedy like no other: The Falling Man.
Drew told The Telegraph that while his subject's story is still shrouded in mystery, he "likes to think of him as the unknown soldier, let him represent everyone (for whom) that was their fate that day".
"I hope people can look at it now and accept that it's a part of what happened that day. We saw pictures of the rescuers, we saw pictures of the planes hitting the building, we saw the recovery effort and now we can also try to accept that as part of what really happened that day."
THE TRUE STORY OF THE FALLING MAN
As newspapers published shocking images from the most photographed and videotaped day in history, some were deemed too awful, too confronting for the public to face.
In particular, the pictures of the estimated 200 people who fell to their death from the Twin Towers.
One photo, though, was the most controversial of all: the Falling Man.
"On a day of mass tragedy, Falling Man is one of the only widely seen pictures that shows someone dying," said Time magazine.
After The New York Times ran the photo on page seven the next day, it was branded "disturbing", "exploitative" and "voyeuristic".
It was struck from the record, until two years later it appeared in an Esquire article in 2003.
In the days following the terrorist attack, which killed almost 3000 people, images of heroism and triumph in the midst of tragedy were emblazoned across newspaper front pages.
But as time passed, there were calls for Drew's image to be investigated; who was the Falling Man and what was his story?
Captured at 9.41am the man, falling from the north tower of the World Trade Centre, is believed to have been trapped on one of the upper levels.
Although attempts have been made to formally identify him, none have proved successful.
Toronto Globe and Mail reporter Peter Cheney, initially tasked to solve the mystery, found him to be of Latino origin, with a goatee, black pants and a white tunic; similar to that of a restaurant worker.
It's possible the man worked at Windows on the World, a restaurant at the top of the North tower, which lost 79 of its employees.
It's also possible he worked at catering service Forte Food, which lost 21 employees, who were mostly Indian, Arab and Latino. Many had short hair and goatees.
One of the men most often linked to Falling Man is Norberto Hernandez, who worked at Windows as a pastry chef.
Cheney took the picture to his brother Tino and sister Milagros who both identified the Falling Man as Norberto.
He then tried to show the image to Norberto's wife Eulogia who refused to speak with him or confirm it was her husband. With nowhere else to go, Cheney took the photograph to Norberto's funeral and showed it to the eldest of his three daughters, Jacqueline.
She looked at the photo, then angrily responded: "That piece of sh*t is not my father," reported Esquire.
The picture has since divided the Hernandez family.
"They said my father was going to hell because he jumped," Catherine, one of Norberto's daughters, said.
"On the internet. They said my father was taken to hell with the devil. I don't know what I would have done if it was him."
One detail in the Falling Man's clothing could be the key to discovering his identity – a bright orange undershirt he was wearing under his tunic, seen in a number of the 12 images captured by Drew.
"I dressed him," Eulogia said.
"Every morning. That morning, I remember. He wore Old Navy underwear. Green. He wore black socks. He wore blue pants – jeans. He wore a Casio watch. He wore an Old Navy shirt. Blue. With checks.
"My husband did not have an orange shirt."
Someone who did regularly wear an orange undershirt though, was Jonathan Briley.
Briley was a 43-year-old sound engineer who also worked at Windows and was a light-skinned black man, with a moustache, goatee and short hair. His co-workers believe the Falling Man is him.
His brother, Timothy, who was tasked to identify his brother, knew him by his shoes – black high-tops, similar to those pictured.
According to Jonathan's sister, Gwendolyn, he had asthma and the billowing smoke would have made it hard for him to breathe.
He wore an orange undershirt so often that Timothy used to tease him about it.
"When are you going to get rid of that orange shirt, Slim?"
But it's unlikely we will ever know with any certainty who the Falling Man was.
Now, 19 years later, while still confronting, we can look at the image and acknowledge the bravery of those souls who had no other choice, who experienced the full horror of September 11, and who need to be remembered, not struck from the record.


